
- Home >
- Free Support & Guides >
- Online Teacher Support >
- Measurement & Geometry Strand Chapters 10 to 17 >
- Chapter 17 Location >
- CH 17|Overview & Teacher Resource Sheets
Measurement & Geometry
Chapter 17 | Location
Overview & Teacher Resource Sheets
Rich tasks
- These are problem solving open-ended questions related to describing location. They can be given at the start of a topic and
done as the students gain enough knowledge to complete them, inserted into a topic at an appropriate place, or given as homework, or extension.
- An alien is amongst us
- Let’s go orienteering
> More on "Rich tasks for this Chapter"...
1. An alien is amongst us
- Encourage students to plan the task. They should decide on the places the alien should visit before starting.
- A large map of New Zealand might be useful.
- This task could be linked with a social studies investigation about tourism and the best places to visit in New Zealand.
- Encourage students to be imaginative in their choices because they are for an alien.
- Encourage students to be creative in the clues they give.
2. Let’s go orienteering
- Orienteering increases in complexity as levels become more competitive. Students should research just enough information to be able to map out a short course either in the school grounds or in a nearby reserve or park.
Six-figure grid references
- Describe the location of and locate places using six-figure grid references that have three numbers on each axis.
> More on "Six-figure grid references"...
Teaching ideas

 Mapping (Teaching resource sheet 80)
This link displays a link to a topographical map. Students are asked how to use a 4-figure grid reference to find various places on
the map.
Tell students that some treasure is buried somewhere in the square 9087. Point out that in order to find the treasure, a more accurate way of describing it would be needed. Ask students for suggestions. If nobody comes up with the idea of further dividing the square and adding another reference, you could suggest that idea and then ask these questions.
1. How could we number and record the new divisions in the square?
2. Could we combine the new divisions with the 4-figure grid reference number to make a new 6-figure grid reference?
You could discuss the idea of a 3-D grid reference that takes depth into account.
Teacher notes
- Six-figure grid references can be difficult for some students after becoming used to 4- and 2-figure grid references. Students often forget that the first two numbers and the fourth and fifth numbers give the reference of the bottom left hand corner of the square. Then the square has to be divided again into 10 by 10 in their mind’s eye and the last numbers of each part of the 6-figure grid reference are the coordinates of a point in this square. Again challenge them to come up with a novel way of remembering this.
- It could be useful for students and teachers to view the North Island on Google Maps. Zoom out and in from each of the various views to compare what is shown on a topographical map with that shown in a satellite view and also to see where each place lies in relation to another. For very visual students this experience might clarify some of the symbols used on the topographical map.
- You could create some questions of your own for each of the maps.
Compass directions and bearings
- Be able to measure and write down the bearing of one place from another.
- Use bearings to locate a place.
> More on "Compass directions and bearings"...
Teaching ideas
This link displays the Getting started on page 287 for use as a class discussion.
- On what bearing am I?
 A 180º or 360º board protractor
1. Ask for two volunteers.
2. Ask one student (A) to stand facing the board and the other (B) positioned anywhere in the room.
3. Student A turns clockwise to face directly at student B.
4. Ask “How could I describe where student B is standing with reference to student A using this angle?"
(You may need to prompt to get the answer that an angle from a line drawn at student A could be measured.)
5. Ask "What if I wanted the bearing of student A from student B?”
6. Draw diagrams like these to illustrate.
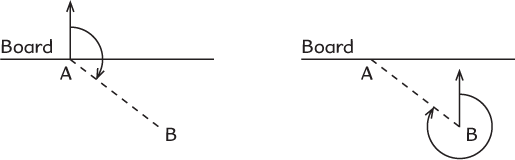
This link displays a diagram like the one on page 295.
Note: You will need to display the grid on a write-on surface so that students can write on the grid.
Ask students to work out what bearing these directions are:
East (90º), South (180º) and West (270º).
Then ask students what bearing these directions are:
South East (135º), North West (315º), North East (045º) and South West (225º).
Teacher notes
- Point out that the place or point where the bearing is measured from is where the North line is drawn.
- Remind students to find a way to remember which of the four main directions go where on a compass. For example, by making up a mnemonic like Never Eat Soggy Weetbix.
- A map will have a North line (usually pointing to the top of the map) to help when measuring bearings. Remind students to look for this as sometimes the North line doesn’t point up the page.
- Students need to be careful to place the centre of the protractor at the place where the bearing is being taken from and to be careful to read the scale that starts at zero on the North line.
Longitude and latitude
- Describe the location of places on the globe using latitude and longitude using maps and GPS devices.
- Use latitude and longitude coordinates to locate places on the globe.
> More on "Longitude and latitude"...
Teaching ideas
- The Globe
A globe with latitude and longitude lines
Show that the lines of latitude are parallel to the equator and are equidistant.
Show that the lines of longitude radiate from pole to pole and cross the equator at right angles. These are not equidistant.
- The orange analogy
Take two oranges. Cut one in slices cross-wise in parallel slices ,from one pole to the other pole, then put it back together with rubber
bands holding it pole to pole (Prime meridian). Slice the 2nd orange in segments pole to pole (1/2 then quarters then eighths). Put it back together with a rubber band around the middle (the equator).
- Where are you?
This link takes you to a site where if you put in the address of a place it will give you the latitude and longitude. Put in the addresses of some of the students and write down the latitude and longitude. Discuss how similar and different the coordinates are depending on how far apart the addresses are.
https://getlatlong.net/
- Read it off the map
This link displays a map with latitude and longitude coordinates on it. Ask students some questions about it.
http://www.bestcountryreports.com/Political_Map_New%20Zealand.php
Teacher notes
- Lines of longitude and latitude are best shown with reference to a globe as then students can see how the lines of longitude converge at the poles and lines of latitude remain parallel.
- The circumference of the Earth is greater at the equator due to the Earth’s rotation, which causes the world to bulge at the equator.
- Accurate locations can only be given using very small angle measurements of degrees, minutes and seconds. GPS devices often give these as decimals. To convert a value given as a decimal to minutes, multiply the decimal part by 60.
Map reading
- Use scales, bearings and grid references to locate places on a map and follow directions from one place to another.
Teaching ideas
- Use the copies of the maps in the exercise
Each of the questions in Activity 5 has a Printable Master
Activity 5 - Question 1,
Activity 5 - Question 2, and
Activity 5 - Question 4.
You could display one of these and work through it as a class or group.
Teacher notes
- Students need exposure to all of the different ways that scales can be presented on a map or plan. This is best explored using maps that interest the students, such as maps of their local area or maps that the students find for themselves.
- Reading maps integrates many measurement topics such as converting between measures, estimating, compass directions, angles, grid references and scales.
- Students seem to have most difficulty in using scales given as

- It is important that students are well practised in converting between measures so that they can give answers using
appropriate measures. - Students might need to estimate distances that fall between given markers.
- To measure distances that are not straight students could use a piece of string to follow a given route and then straighten
it out along the scale. - Students might also have difficulty with scales given as 1:1250 etc. They first need to multiply the measurement by 1250 and
then convert the measurement to an appropriate unit. They need to be comfortable with converting measures.

Caxton Educational LtdPO Box 36411, Christchurch 8146, New Zealand. Telephone: +64 3 366 7091 |
© 2026 Caxton Educational Ltd Publishers. All rights reserved.