
Measurement & Geometry
Chapter 16 | Maps and scales
Teacher Resource Sheets
Scales on maps (page 268)
Getting around (Getting started 16)
(This sheet could be used as a starter to introduce scales on maps on page 268.)
This s displays the Getting started on page 265.
Students will need to be able to estimate distances on a local map so it might be a good idea to help them work this out first. You could get them to describe the directions using the number of blocks rather than distances.
For example, “Turn left and walk three blocks ….”
This site could be useful when working with this activity.
If you are in a rural school, you could use landmarks such as trees or hay barns etc, instead of blocks.
If students have no idea of distance, for example how far 200 m is, you might want to take them into the school grounds and get them to estimate and then measure this distance.
How far? (Teacher Resource Sheet 114)
(This activity could be used in conjunction with the teaching section on Scales on maps on page 268 )
This displays very simple maps with a North line and asks students some questions that require them to know N, E, S and W, and to be able to convert a grid or measurement according to a scale.
Scales
Find a map of the local area that has a very simple scale.
Mark a grid over the top of the map at intervals of 100 m, 200 m, 1 km or whatever is most suitable.
Display the map in some way, either by scanning it and then displaying it on the wall, or projecting it onto a screen.
Ask students questions such as:
About how far is the school from the centre of town?
About how far is ….. from …?
Choose places that are approximately a whole number of squares apart.
Get the students to pair up and ask each other a similar question to the ones above. They can check each other’s answers.
Where am I? (Teacher Resource Sheet 115)
(This sheet could be used prior to Activity 1 on page 268.)
This displays a map of a theme park.
Students are asked questions about distances and directions.
Using maps (page 271)
Riccarton (Teacher Resource Sheet 116)
(This activity could be used in conjunction with Using maps on page 271.)
This displays three maps of the same area of Christchurch.
The first map has a scale, the second has a grid and the third has a North line.
A sample question for each type of map is given. It would be very easy for you or the students to make up further questions about each map.
You could then discuss the sorts of information that can be found from each map. Ask the students what they would need to have on a map to be able to give directions to someone wanting to get from one place to another. Ask them to explain why those things would be helpful.
Is it different? (Teacher Resource Sheet 117)
(This activity could be used prior to Activity 2 on page 272.)
This shows two maps of the South Island with different scales and different orientations so that the North line is not pointing upwards on one of the maps. Students are asked if the distance between Christchurch and Dunedin is the same on both maps and if the direction to get from Christchurch to Dunedin is the same.
Discuss the fact that not all maps have North pointing straight up the page and what the meaning of North is.
Eden and Holly (Teacher Resource Sheet 118)
(This activity could be used prior to or during Activity 2 on page 272.)
This displays the following discussion.
Eden gave her friend Holly directions to her house.
What path on the map should Holly follow to get there?
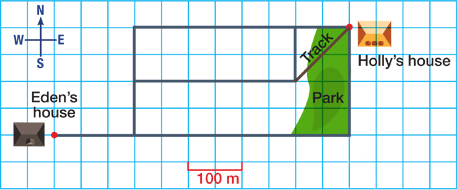
Eden “Go West for 400 m then South for 200 m then West again for 150 m. Then you will be at my house.”
What other directions could Eden have given?
Which route is the shortest?